Equipment required:
Qibixx MDB USB Standard
https://www.shop.qiba.pt/shop/900-0-c02-2300343-mdb-usb-standard-3928
Qibixx MDB Power Supply + MDB adapter
https://www.shop.qiba.pt/shop/mdb-power-supply-3929#attr=74
Nayax VPOS Touch
https://www.nayax.com/solution/vpos-touch/
Configuring the MDB-USB Interface
There are two versions of the MDB-USB Interface board. The MDB Payment Utility will work with either version. The latest version has “MDB-USB Interface VMC/Peripheral” printed on its case. This does not need any special configuration or changes to jumper settings.
The older version has “MDB-USB Interface Master/Slave” printed on its case. This has a number of jumpers https://docs.qibixx.com/mdb-products/mdb-usb-standard-jumpers which should be set as follows:
- Jumper 1 should be disconnected to disable firmware update mode
- Jumper 2 is the debug port and isn’t used
- Jumper 3 is CPU power selector – some boards don’t have this but if present it should be set to MDB power
- Jumper 4 should be disconnected because it is not powered via USB
- Jumper 5 should be connected because it is acting as a VMC host
- Jumper 6 should be connected
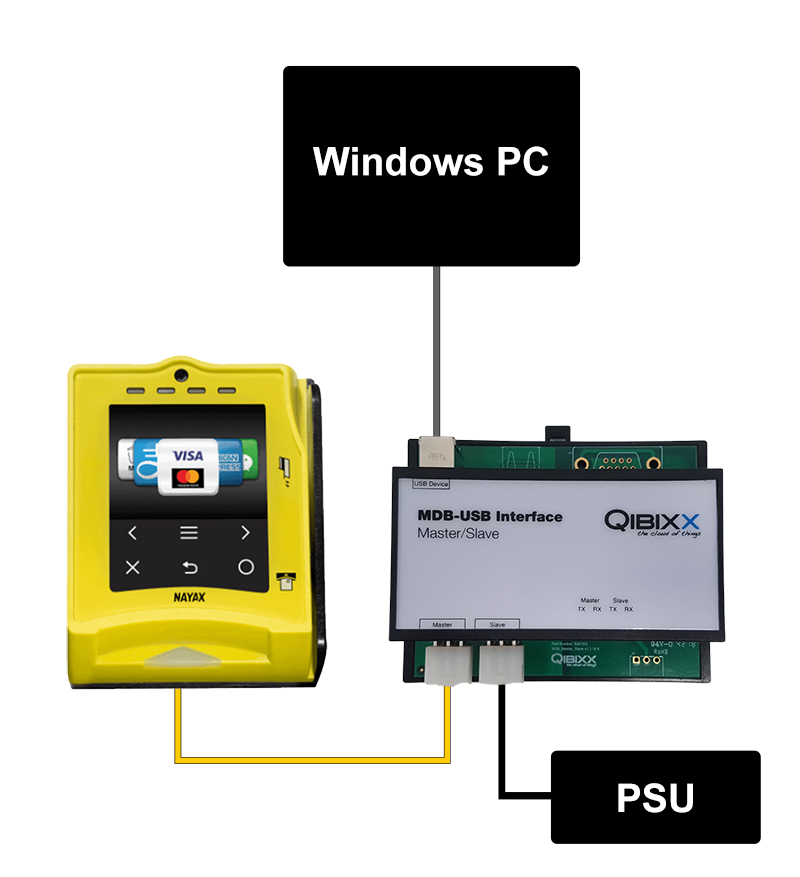
Connecting everything up
Connect the power cable from the PSU (power supply unit) to the peripheral (or slave) connector on the MDB-USB Interface. Then connect the yellow cable from the Nayax VPOS Touch to the VMC (or master) connector on the MDB-USB Interface and connect the MDB-USB Interface to the Windows PC via USB.
Running the MDB Payment utility
Next run the MDB Payment utility:
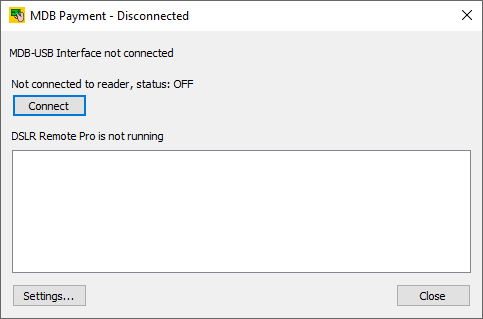
Status
The top few lines show the status of the MDB-USB Interface and the payment system (or reader). When you run the MDB Payment utility for the first time this will show the status as being disconnected.
Connecting
The “Connect” button will connect or disconnect to the MDB-USB Interface.
Photo Booth Status
The line below the “Connect” button shows the status of the photo booth app and the area below it shows a log of events.
Settings
Click on the “Settings…” button to set up the utility:
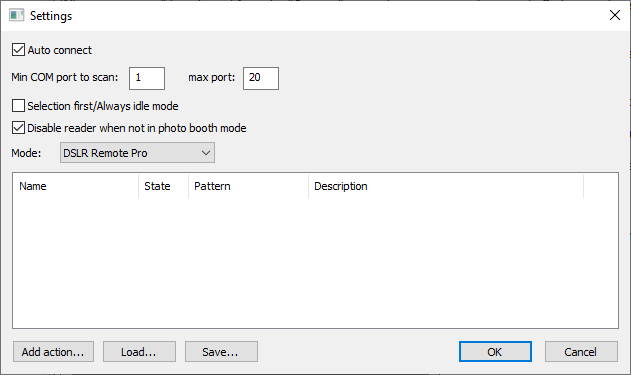
h2 Auto Connect
Select “Auto connect” to connect automatically to the MDB-USB Interface.
The “Min COM port to scan” and “max port” settings specify the range of serial COM ports to scan when attempting to connect to the MDB-USB Interface. Normally there is no need to change these settings unless other serial devices are connected to the computer.
Selection First/Always Idela Mode
The “Selection first/Always idle mode” checkbox should be set if the payment system is set up in “Selection first/Always idle” mode and unchecked if it is in “Authorization first/idle mode”. The Nayax VPOS Touch is normally shipped with MDB level 1 which supports “Authorization first/idle” mode and so this checkbox should be left unchecked.
Disable Reader
The “Disable reader when not in photo booth mode” checkbox will disable the payment system when the photo booth is not running. When the Nayax VPOS Touch is disabled it displays the “Cash only” screen. The text displayed on the “Cash only” screen can be edited by logging into the Nayax web Dashboard and editing the machine settings.
Mode
The “Mode” dropdown list is used to select the type of photo booth being used: either Breeze RemotePro or Breeze Booth for iPad. Most of the examples in this help file show how to connect to a photo booth running using Breeze RemotePro.
Add Actions
The “Add action…” button is used to add actions responding to events from the payment system or the photo booth. This will be described in more detail in the examples sections of this help file.
When a number of actions have been defined the settings dialog will look something like this:
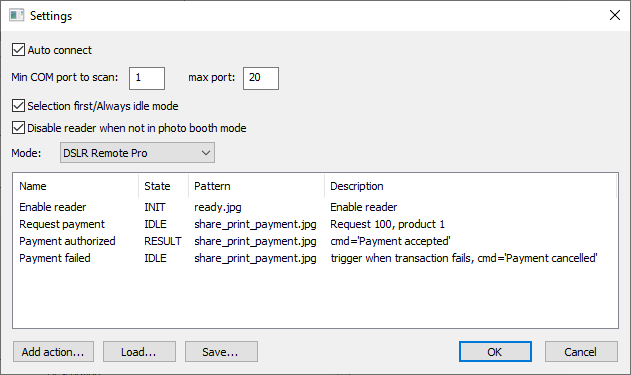
Edit & Delete Actions
Actions can be edited by double clicking on them in the list or right clicking on the action and selecting “Edit action…”. Actions can be deleted by right clicking on the action and selecting “Delete action”.
Save Actions
The actions can be saved to an XML settings file by clicking on the “Save…” button. Previously saved settings can be loaded by clicking on the “Load…” button. Please note that when loading settings from file the current settings will be replaced by the ones loaded from the settings file.
Click on the “OK” button to save the settings. The utility should connect to the MDB-USB Interface and display a screen similar to the one below:
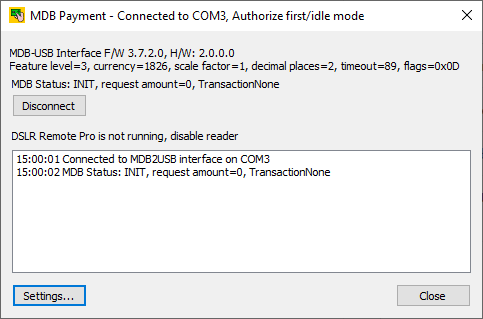
If it connects to the MDB-USB Interface it will show the MDB-USB Interface’s firmware and hardware versions in the first status line and the connection status in the window title bar. If the Nayax VPOS Touch is connected the MDB status will be shown as INIT otherwise it will be shown as OFF.
Clear the Log
Right click on the log area to clear the log or to save it to file.
Troubleshooting
First check that you are running the latest version of the MDB Payment Utility by clicking on the icon in the top left corner of the window and selecting “About MDBPayment…”. You need to be running version 1.0.1 or later to work with the latest MDB-USB Interface hardware.
If the MDB Payment Utility doesn’t connect to the MDB-USB Interface try pressing the “Connect” button. You can set it up to connect automatically when the MDB Payment Utility runs by selecting “Auto connect” in the settings.
If it still doesn’t connect check the USB connection between the computer and the MDB-USB Interface and the power supply.
If you have the older version of the MDB-USB Interface which has “MDB-USB Interface, Master/Slave” printed on its cover you need to check the jumper settings.
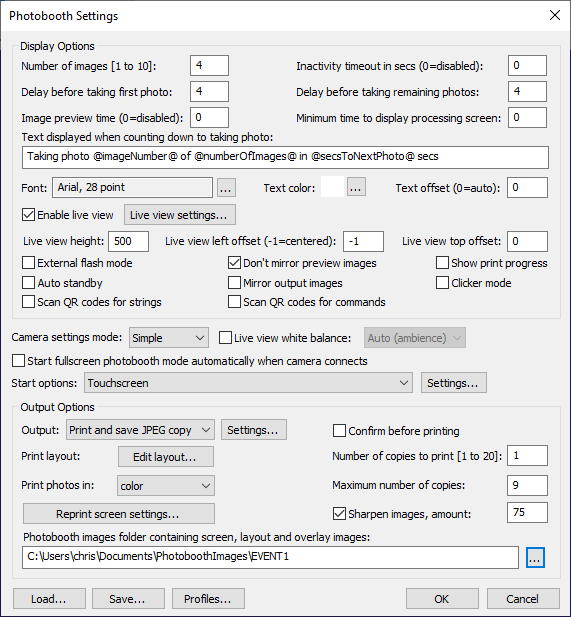
If Breeze RemotePro does not respond to commands sent from the MDB Payment Utility check that “Start options” is set to “Touchscreen” in Breeze RemotePro’s “Photobooth Settings” dialog: